A Different Perspective: The Lost Art of Mixing Refractory
Each year, lack of continuing education, missed opportunities to record historical data, and lost expertise at power plants and original equipment manufacturers (OEM) result in an overall loss in knowledge and experience with refractory work. Another concern for the industry is the common practice of using non-typical labor craft for mixing and installing refractory. This article provides information both on how to record necessary steps for mixing and installing refractory, and on how to help educate the crafts that are installing refractory at power plants.
Who Does What?
Power plant work—such as welding plate and pressure parts, erecting steel, electrical work, material handling, fly ash removal, and installing refractory—is typically assigned to people who have been trained to perform that work. Most work done at a power plant has some type of published standards, procedures, or best practices that are accepted and applied throughout the industry to help ensure that the work is done correctly. (For example, the American Society for Testing and Materials, National Board of Boiler and Pressure Vessel Inspectors, and the American Society of Mechanical Engineers all provide standards for this type of work.) Unfortunately, when it comes to refractory, there are no accepted industry standards or monitoring board or association that says how it is supposed to be done or who is supposed to be installing it. This may be the reason that many power plants use or allow non-bricklayer-type labor to mix and install refractory.
Such overlapping of work responsibilities, where one craft claims another’s work, can trigger a jurisdictional dispute between competing unions. In turn, the jurisdictional disputes can help define what craft is responsible for installing what material, or for which types of work. The International Union of Bricklayers and Allied Craftworkers, and the International Association of Heat and Frost Insulators and Asbestos Workers Agreement, for example, explains the conditions under which bricklayers can claim the installation of insulation over the outside of boiler walls.
Standard Procedures and Practices
Refractory is too important a component on a steam-generating boiler to worry about labor jurisdiction or responsibilities, which suggests that there is a need to establish some practical and agreeable procedures for installing refractory. Proper refractory installation can only be achieved when good refractory practices are followed (regardless of who or which craft is doing the work). The following guidelines may be a good starting point for ensuring the proper installation of refractory:
General Mixing and Installing Information for Troweling, Casting, or Pouring
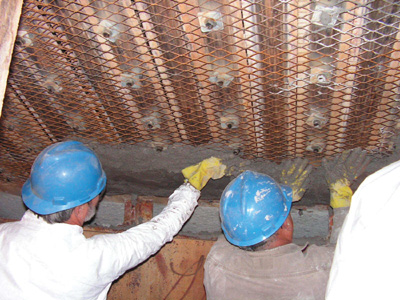
These general mixing and installation instructions apply when installing refractory by troweling, casting, or pouring. The cast or pour method is defined as installing refractory when filling seal or wall boxes, or when installing a large amount of refractory, with the use of forms to retain and hold the refractory. The trowel method is defined as installing thin refractory linings by hand, or when the location is not readily accessible for other applications. The consistency of the refractory mix will vary not only by the characteristics of the refractory material, but also by the application requirements. The following steps should be taken as minimum requirements for properly installing refractory when using these types of applications:
- Read the refractory material data sheet before using any refractory material.
- Read the information on the back of refractory bag, taking note of the following:
- Percentage or range of water recommended (range usually applies to application needs)
- How long to mix the refractory material
- Date the refractory material was made
- Pot life of the refractory
- For proper mixing, remember the following points:
- The amount of water required for mixing will vary by the characteristics of the refractory material and application requirements.
- Add just enough water to meet the application requirements (such as being sticky and capable of staying in place for troweling, or in a fluid state for pouring and casting-see ball-in-hand, Item 5, below).
- The water source for mixing refractory should be potable (drinkable) or treated water–never river water.
- The final mix temperature should be between 50°F and 90°F.
- A wetter mix may handle more easily, but it robs the refractory material of its needed strength.
- A mix that is too dry is difficult to place and may set to a weak, porous, “popcorn” structure.
- A proper refractory mix usually will seem on the thick side, as compared to mixing conventional concrete.
- All tubes or penetrations located inside a refractory seal area should be coated or sealed with a parting agent (such as white latex barn paint) prior to installing refractory.
- Calculate and fill the required water amounts into clean containers (pails) prior to mixing the refractory. The water amount initially will be based on the refractory manufacturer’s recommendations, found on the back of the bag, and the size of the mixing device being used (a two-bag paddle mixer). Also remember the following:
- Always use clean containers, and periodically rinse them.
- Never pour water directly into the refractory from a water hose.
- Adjust the water amounts during the first two mix batches for mix consistency and workability at install, then add holes in the container just at the water lines of each container. This will ensure that the water amounts will be the same from one mix batch to another.
- Use a device (a wrist watch with a second hand, or a stop watch) to accurately record the length of time the refractory is mixed.
- Use the ball-in-hand method to test the consistency of the refractory before using and installing a refractory mix. Make a small ball of refractory mix (2 to 3 inches in diameter) and toss it 12 inches into the air, taking note of the condition of the ball as it hits the flat palm of the hand that catches it. Follow these rules of thumb:
- If the ball breaks, it is too dry for all applications.
- If the ball flattens out, it is too wet for troweling but acceptable for pouring and casting.
- If the ball retains its size and approximate shape, it is acceptable for troweling.
- The ball-in-hand method should be done after every batch.
- Place the mixed refractory into clean pails and transport to the work location, making sure to put equal amounts into each pail for ease of installation and for monitoring material quantities and labor productivity.
- Do not over-trowel the finished surface of the refractory. Over-troweling will bring the cement to the surface and will seal the refractory surface, restricting the escape of water vapor (which occurs during dryout).
- Vibrate all cast or pour applications to remove all air bubbles trapped inside the refractory.
- Properly prepare the surface of the refractory after installation is complete by taking the following steps:
- Hand brush or curry comb the surface of all exposed refractory to keep the surface open to promote proper dryout.
- Keep the surface of the refractory moist, or the surrounding atmosphere humid, for a minimum of 24 hours to cure the refractory. This can be accomplished using a fine mist of water (but not soaking), covering the refractory with wet canvas bags, or spraying the surface with a manufactured curing compound.
- Protect freshly installed refractory from freezing (if applicable) for a minimum of 48 hours using external heat.
Most refractory projects are small in size and do not require much heavy equipment. The most commonly used and preferred method of mixing is either using a paddle mixer or using a pan or tub for mixing by hand. The following are general instructions for their use:
General Instruction for Using a Paddle Mixer (Two-Bag Paddle Mixer)
- Turn mixer on before adding water or refractory.
- Add half the water amount required into the mixer before adding refractory.
- Add up to the two-bag limit of the desired refractory material.
- Add the balance of the required water slowly to achieve proper consistency for the application desired, checking consistency throughout the process.
- Paddle mix refractory for 3 minutes after all the water and refractory have been added to the mixer. Over-mixing tends to speed up the setting rate. Never remix.
- Test for proper consistency using the ball-in-hand method before removing refractory from the mixer.
- Clean mixer every two to three batches to prevent clogging and paddle jamming.
General Instruction for Hand Mixing Using a Pan or Tub
- Add half the water amount required into the pan or tub before adding refractory.
- Add up to two bags only of the desired refractory material.
- Add the balance of the required water slowly to achieve proper consistency for the application desired.
- Hand-mix refractory thoroughly for 4 minutes after all the water and refractory have been added to the pan or tub. Over-mixing tends to speed up the setting rate. Never remix previously mixed or partially mixed refractory.
- Test for proper consistency using the ball-in-hand method before removing refractory from pan or tub.
- Clean the pan or tub after every mix to remove old material. Never re-use old material.
Save Energy and Cost
Compared to most components found in a steam-generating boiler, the cost of the materials and installation of refractory is very small (less than 1 percent of the total cost of construction). If improperly mixed or installed, however–regardless of who is doing the mixing or installing–it will have an adverse effect on the amount of energy usage for that boiler. Even though refractory is one of the smallest components on a steam-generating boiler, it pays to mind refractory mixing and installation procedures.

