Fire Testing Primer
The subject of fire testing, even as it applies to a single industry such as insulation, is enormous in both its breadth and level of detail. Many laboratories and consultants have quite successfully made it their primary focus, yet even they spend years learning and expanding and tweaking the ways to best test their clients’ products to open new doors for code compliance and applications. To explain everything that you may need to know about fire testing in a single article is nearly (if not actually) an impossible task. Thus, the aim here is to provide a basic reference for sorting through the alpha-numeric soup of test standards one may encounter.
A number of groups, such as universities, states, and municipalities, write standards—either for use within their jurisdiction or for specialized applications. However, most of the test standards for insulations are drafted by the same few organizations: American National Standards Institute (ANSI); ASTM International (more commonly referred to by the older abbreviation “ASTM”); National Fire Protection Association (NFPA); and Underwriter’s Laboratories (UL).
In fire testing, the first question that comes to mind is, why use an outside lab at all? Manufacturers often have their own, internal research and development (R&D) and quality assurance (QA) equipment and staff. A do-it-yourself approach misses out on the greatest components that a dedicated fire-testing lab has to offer, though—i.e., valuable experience and specialized, dedicated equipment. In addition, many codes and authorities having jurisdiction require independent testing, and sometimes third-party certification and design listing.
Physics Primer
In talking about fire performance and standards, test personnel (subject matter experts) use very specialized terminology. Temperature, heat, energy, and power all seem like terms the layman knows and understands, but there are a few subtleties in this context. Energy, or heat, is a measurement of a capacity to change a system. More heat means more change. This is measured in joules (J) or, more conveniently, mega joules (MJ), which is one million joules and is usually discussed in terms of energy release over the course of a test or a particular time span. J/MJ should not be confused with a watt (W), which is a unit of power—the number of joules released per second. A kilowatt (kW) is one thousand joules per second. A simple 12″ x 12″ burner burning propane at 100 kW releasing the gas into the air at standard temperature and pressure produces a flame about five feet high. Left to burn for ten minutes (or 600 seconds), it would release 60MW. The propane gas most commonly used for these tests burns at about 1,200 to 1,600 F. When talking about smoke, the units are somewhat counter-intuitive. People typically think of smoke as a gas, taking up a particular volume. However, smoke is actually just a tiny suspended particulate that blocks light (and impairs the lungs’ ability to take in fresh oxygen). The units used to measure smoke are square meters (m2) a unit of area. Smoke release rate is square meters per second.
Testing 1, 2, 3
The test library can be broken down into three main categories based on sample size: small, medium, and large. Different sized tests fit different needs for different applications. Manufacturers will probably need to use them all at one point or another to provide customers with the right fit.
Small Scale
The small-scale tests that insulators are most likely to see referenced are ASTM C411, ASTM C518, ASTM E136, ASTM E162, and ASTM E662. These tests are most often run in conjunction with larger scale tests to qualify a given product or design. They typically cost less than $1,000 each and are performed on materials that are at most 144 in2. The low cost of materials, testing, and shipping makes them a good place to tune R&D work before committing to larger tests.
ASTM C411
This test is an evaluation of the deformation of a block or pipe insulation on a hot surface over time. It is less a test of flammability than one of durability. A 6” x 18” specimen is placed on a room-temperature surface and brought to the desired temperature at a rate consistent with field conditions. It is then stabilized and allowed to test for 96 hours. Warpage is measured as a linear distance from the center of the specimen. Specimen layering and joints should be as installed.
ASTM C518
This test is one of the better-known methods, but it is not explicitly a fire test. It looks at the energy conduction of a 12″ x 12″ sample and is used to establish the R-value that is familiar to the general public. This test is not very exciting to watch; it is generally automated and set up in the afternoon and allowed to run all night long to establish a good measurement.
ASTM E136
The E136 is more commonly known as the non-combustibility test. The standard uses a specific electric furnace set to 1,382 F (750 C) into which a 1.5″ x 1.5″ x 2″ sample is lowered for at most 30 minutes. The sample has thermocouples on the exterior and interior. The hope is that the specimen will do nothing and just sit there like a rock. More than likely, however, it will do something. Specimens are judged by one or two criteria. In the first, the specimen is allowed to lose no more than 50 percent of its initial weight. Neither the interior nor the exterior temperature rises more than 30 C, and the specimen flame for no more than 30 seconds. If the specimen does lose more that 50 percent of its weight, then it is judged by a second criterion, under which no flaming is allowed at all. The test may be terminated early if the specimen reaches a stable temperature before 30 minutes has elapsed.
ASTM E162
This test is a flame spread test on a 30-degree backwards slope from a radiant heat source. That is, the radiant burner is aligned vertically, with the sample face angled such that the closest point to the heat source is at the top. Down is not a direction that most people are used to seeing flame spread, but down it goes. The heat source measures about 25 kW at the closest point and decreases sharply as the distance grows.
ASTM E662
This is the “smoke chamber test” commonly used along with the E162 (above). In this procedure, a 3″ x 3″ sample is placed in a fixed volume box and irradiated with an electric heat source to produce smoke. The amount of smoke produced is measured using a light source and photocell arranged vertically some distance away from the specimen. This vertical arrangement eliminates any factors that the varying density of smoke in the vertical column may present. Similar to the E162 test and others, this standard does not feature pass/fail criteria. Rather, the test standard is referenced by code bodies and authorities having jurisdiction with their own unique requirements for passing the test.
NFPA 259
This “bomb calorimeter” test measures the energy content of a specimen. It is a very accurate measurement of how much heat is produced when a sample is ignited and burned as completely as possible. This test stands out from the others in that it is much more of a classical chemistry test. The “bomb” designation comes from the tendency of early oxygen calorimeters to explode. Generally speaking, rapidly expanding gases and elevated temperatures and fixed volume make a poor combination. The numerical result from this test is kJ/kg.
Medium Scale
This is where things start to get more interesting. Testing on this scale is a more dramatic event. While using larger and more dramatic ignition sources than the small-scale methods, tests like room burns allow proximity and close observation that is not often possible behind furnaces with layers of high-temperature glass.
ASTM E84
As one would expect, with some competition among them, as well as local or industry policy, many of the standards groups have developed test methods that are identical (or nearly so). While there has been some consolidation and standardization, there is still plenty of overlap. An ASTM E84 might also be called a UL 723 or NFPA 255.
The E84 Tunnel is one of the oldest and most often called upon tests for building products. Named after its inventor, the Steiner Tunnel mounts an 18″ wide x 24′ long sample to the roof of a tunnel with a pair of gas burners at one end and a forced draft that pulls the flames down toward the other. The travel of the flame front on the specimen, as well as the smoke produced, is compared to red oak and cementicous reference standards to produce Flame Spread and Smoke Developed Indices (FSI and SDI). As a comparative number, they do not use a unit, like meters or degrees Kelvin. Specimens that are not rigid enough to stay up on their own are allowed to be supported with steel rods spaced 2″ apart. If additional support is needed, hexagonal wire mesh might be added.
Both FSI and SDI are functions of area under the curve, though they are computed slightly differently. The smoke value is strictly the area under the curve. FSI is the area under the curve from the beginning of the test to the point where the flame front reaches its peak. Beyond this time, even if the flame recedes, the FSI is calculated as the product of time and the maximum distance. In practical terms, if the flame quickly spreads down the length of the tunnel and then recedes, the calculation is performed as if it never receded at all. This can be a real problem if an exposed facing material ignites and allows rapid, though short-lived, flame travel.
In addition to math computations that are difficult to explain, determining exactly where a flame front should be recorded during the course of a test requires a great deal of experience. The glass looking into the tunnel is often dirty, and the sample’s own smoke does not help the situation.
E84 classification
Two of the most common questions that flammability testers are asked by those new to tunnel testing are, What do these numbers mean? Did I pass? Again, there is no E84 pass/fail criteria built into the standard. A product’s pass/fail depends largely on the code governing the application and authorities having jurisdiction. For example, NFPA 90A and 90B, which cover ductwork and air handling equipment, require that products have an FSI/SDI of 25/50. International Building Code (IBC) Chapter 26, which covers foamed plastics, has a requirement of 75/450 if used in the core of an insulating panel, but only 25/450 if used in another application without a thermal barrier. Similarly, IBC Chapter 7, covering fire-rated assemblies, requires a rating better than 25/450 for all concealed insulations. The point is that a careful check of the applicable code is required. If a manufacturer does not have a dedicated code compliance person on staff, independent consultants may be a good idea. Consulting with the test laboratory can also provide assistance.
Back to the Steiner Tunnel test: How does it apply to the insulation industry? Insulating the underside of a flat ceiling in a narrow cavity with a permanent draft seems like a pretty contrived situation. And why compare it to red oak? Wood flooring is not exactly an industry standard for insulation. This brings up one of the central caveats of fire testing and many other testing disciplines. This exercise is not designed to simulate or replicate any particular real-world situation. At its heart, it serves to provide a common basis for evaluation of a whole universe of materials and designs.
ASTM E2231
This is another standard that may be mentioned in connection with the E84. It is not so much a testing standard as a method for mounting pipe and duct insulations in the Steiner Tunnel. It dictates the mechanical and adhesive attachment methods, location of seams and joints, and required adaptations for cylindrical or other non-rectangular shapes. It is far too detailed to attempt to summarize here. The best strategy for tackling this one is to discuss it with the test laboratory prior to shipping the samples, or to purchase and review the standard if you will be doing the prep work yourself.
NFPA 274
The “pipe chase” test resulted from an attempt to design a test that is more comparable to a field application. In this test, an L-shaped insulated duct is fitted with a 12″ x 12″ sand burner at the bottom; and one, two, or three pipes or HVAC ducts are hung in the interior. The pipes are insulated with the material to be tested. The sand burner is run with an initial three-minute flame of 20 kW, followed by a seven-minute flame of 70 kW. The specimen is judged to have passed if the test does not yield a peak heat release greater than 300 kW, a total energy output of 50 MJ, more than 500m2 of smoke, or a flame that extends more than 12″ above the top of the test duct. Acceptance of this test for code compliance purposes is still not widespread, as it is relatively new.
Room Burns
Room burns are simple to describe. A mockup room is built using standard gypsum and stud construction. The room is lined with the product being tested, such that the final dimensions are 8″ high, with an 8″ long back wall, and either 8″ or 12″ deep side walls. There is a normal-sized doorway at the opposite end of the room to allow oxygen to enter, smoke to evacuate, and observations to be made. These tests can become about as dramatic as they get, though that is not usually a good sign for the test sponsor. There are three main standards: the NFPA 286, UBC 26-3, and UL 1715. The last two are essentially the same test, though they have some slightly different instrumentation requirements. This test is most commonly used to qualify a product for use as a wall covering without a thermal barrier.
UBC 26-3 and UL 1715
These tests are ignited with a 30-pound wooden “crib,” which is a 15″ x 15″ x 15″ stack of softwood 2″ x 2″ x 15″ arranged in alternating directions to allow ventilation. It is a corner test in that only two walls and a ceiling are tested. It may be configured for walls only, a ceiling only, or both walls and ceiling. This test fails when the ignited flame front reaches the extremities of the walls or when there is excessive smoke, excessive charring, or the catastrophic failure of a flashover. “Flashover” describes a situation where a large amount of hot gas trapped in the room ignites quickly and violently, usually with flames reaching out the door. They are very impressive to watch, though disheartening if it is your product at the root of it.
NFPA 286
This particular variety of the room corner test tests the 8′ x 8′ back wall, two 8′ x 12′ sides and the 8′ x 12′ ceiling. Its ignition source is a propane sand burner, similar to that used in the NFPA 274. Also similar to that test, it has a two-stage ignition source: 40 kW for five minutes, then 160 kW for ten minutes. As with many other tests, the pass/fail criteria are not contained in the standard, but rather are a part of code. The usual requirements are found in IBC Section 803. During the 40 kW ignition, flames are not allowed to spread to the ceiling at all. During the 160 kW exposure, flames should not reach the extremities of any side wall. During the entire course of the test, smoke release must be less than 1,000 m2. Of course, the flashover requirement is in place.
Large-Scale Testing and Design Listings
Last, but not least, are the large-scale tests. All the tests covered thus far use test samples that are most like field installed conditions. These methods evaluate not only the manufacturer’s product, but also the installation techniques and hardware. As such, they are often referred to as a “system” or a “design” that features the test sponsor’s product as a critical component of that system. Often, the goal is to generate a “listing” that either the laboratory or other third-party certification agency maintains. Like a test report, the design includes specifics of what materials and methods are used, and a summary of the performance, usually stated as a time rating, during which the design is known to comply with the test’s performance criteria. Those lists can be specific to the brand and model of the materials that were actually tested, or be broadened using an engineering evaluation to include a generic product types. The listing agency generally publishes or makes available some library of designs and their respective ratings, which architects and engineers can choose to incorporate into their client’s construction and that are recognized by the authority having jurisdiction.
Many customers elect to test designs to worst-case scenarios—for example, using a reduced number of fasteners, ducts and penetrations with greater cross-sectional areas, or thinner insulation. This way, a more robust construction may be covered by the same design with minimal engineering evaluation.
ASTM E119
Like the E84, the E119 is a very common and universal standard. It uses either a large horizontal or vertical furnace that heats a single side of a sample at a time. Products also may be placed into a horizontal furnace and completely engulfed. The designs most often subjected to this test are rated walls, floors, ceilings, penetrations, columns, and pipes. Many designs are tested under a load.
The most prominent feature of this standard is the E119 time/temperature curve, indicating the required temperature of the furnace at any given point during the test. The shape of the curve increases sharply at the beginning and gradually evens out to more slowly escalating temperatures further into the test. Insulation performance is monitored with thermocouples on the non-fire side and sometimes the interior, depending on the nature of the specimen. The design’s integrity is monitored by watching for development of holes through which flames may escape. Comparable to real-world conditions, specimens are often further evaluated by dousing them with a fire hose immediately after removing them from the furnace. The pass/fail criteria are included in the standard and are specific to the type of product being evaluated, although basically they all look at temperature rise.
UL 1709
This standard is similar to the E119 in form and function except that it requires a very rapid escalation of the furnace. The time/temperature curve rises to 2,000 F and stays there after only five minutes, while the E119 does not reach this temperature until four hours have passed. This high temperature requires a powerful furnace and can be difficult to control. It is important to use a well-equipped and knowledgeable laboratory for these tests. The test evaluates structural steel and is often required for applications such as petrochemical or shipping, where fires of that scale are possible and failure is disastrous.
Grease Ducts
As noted in the E84 section, products used in ventilation ducts and other air- handling spaces are subject to stricter requirements than other comparable applications. Because of their hazardous role, kitchen grease ducts must endure very demanding testing. The most common standard is the International Code Council Acceptance Criteria 101. (AC101) Some areas may still require the UL 1978, but they are fewer and farther in between.
AC101 is actually composed of several test components. In addition to the evaluation of the duct system, the insulation must pass requirements of the ASTM E119, E136, and C518. Often, the design listing for AC101 ducts specifies certain sections that have been evaluated. The C518 stipulates that samples that have been subjected to an aging process shall not have their thermal conductivity rise by more than 10 percent. However, the really interesting part of AC101 is the internal grease fire and engulfment components.
In the engulfment portion, an L-shaped duct is suspended from a rated floor/ceiling assembly, acting as the furnace cover with a penetration out the top. The specimen is then subjected to the E119 time/temperature curve for the desired period with a hose stream test following. Presuming that the specimen passes the temperature requirements, the duct must not develop any breaches or openings into the interior or through the penetration seal.
For the independent evaluator, the internal grease fire test is impressive to watch. One can only imagine, however, how stressful it must be to the test sponsor. The test is conducted on an L-shaped insulated duct. There must be two joints and an access opening to the interior. Initially, the interior air temperature is raised to 500 F for hour hours, measured midway down the duct’s length. During this period, exterior thermocouples may not exceed 117 F over initial ambient conditions. Following this, the temperature is raised to 2,000 F for 30 minutes, during which time the average temperature on the exterior thermocouples is not allowed to increase by 325 F at any one point, or 250 F averaged over all points. As one would expect, no openings or flames on the exterior are permitted.
Summary
The standards that were addressed here only skim the surface of the basic tests. An authority having jurisdiction, or an architect, may have any number of specialized requirements. Certainly, some of these will not even apply to some products, as putting mineral, plastic, glass, and more exotic insulations into one bucket is a tough fit.
Referencing the strong connection between time and money, it is important to fully use resources to get the best return on the investment. Using an experienced and qualified testing laboratory can hasten the process. Communication is vital. One must fully understand what the authorities having jurisdiction, architect, or specifier requires. Also, one needs to be sure to relay to the test lab exactly what it is that they want to evaluate, and to what purpose. Very often, the testers may know of a way to facilitate the testing and provide more service than expected.
Making assumptions can be costly, so users should be sure that they understand what the lab requires and what they can and cannot do with a given test. Especially if an engineering judgment is required, one should be certain that this is brought up before sample construction is begun. Finally, users should make an effort to witness as much of their testing as possible. Though not as critical for small-scale tests, when working with specimens whose performance relies on complex interaction between materials, first-hand observation by those who work intimately with the product will yield information that could never be teased out of a two-dimension photograph or test video.
With some basic understanding of the options and what is required, product testing does not need to be as complicated or as daunting as it may initially appear. When handled properly, it can present exciting and profitable challenges.
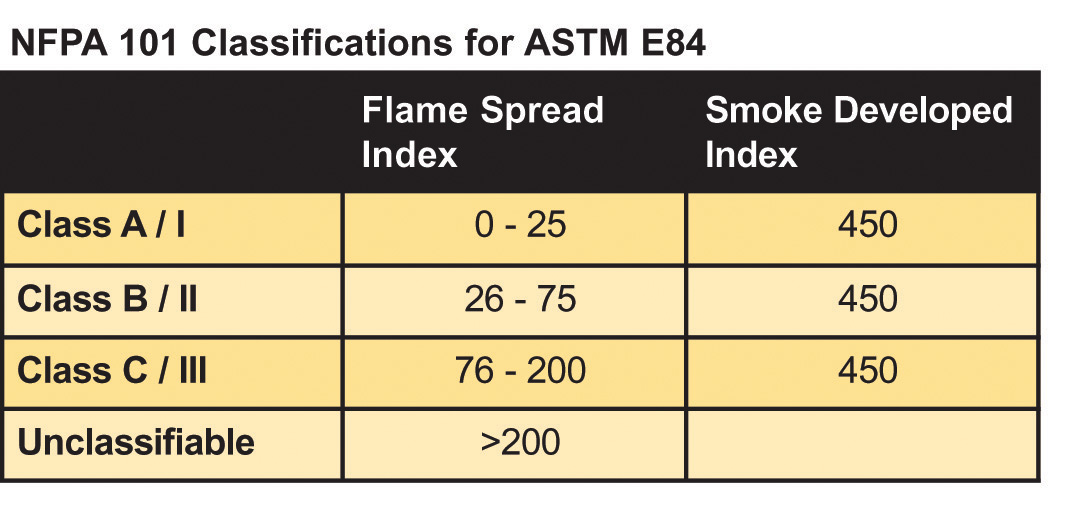 Figure 1
NFPA Classifications doe ASTM E84
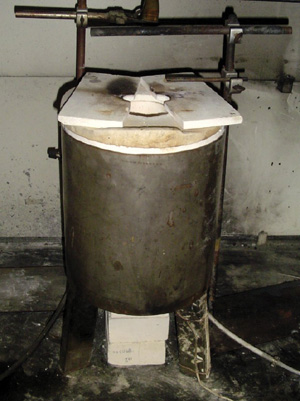 Figure 2
E136 Furnace
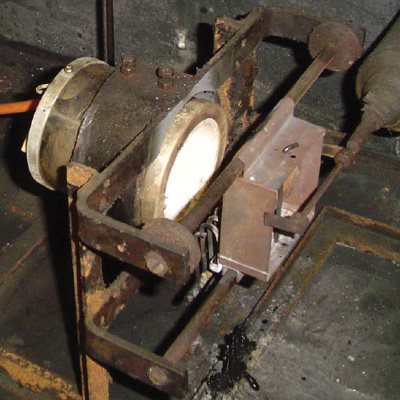 Figure 3
E662 radiant heat source and sample holder
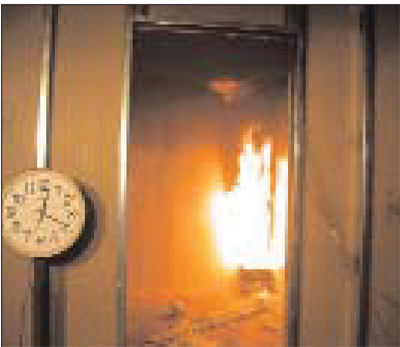 Figure 4
NFPA 286 Ignition
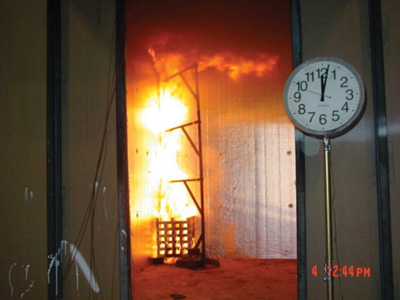 Figure 5
UBC 26-3 Ignition
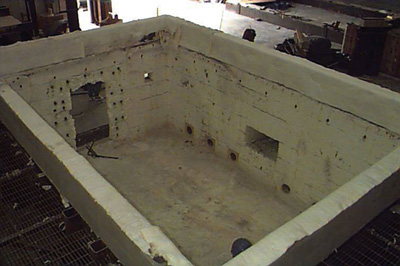 Figure 6
Large Scale E119 furnace
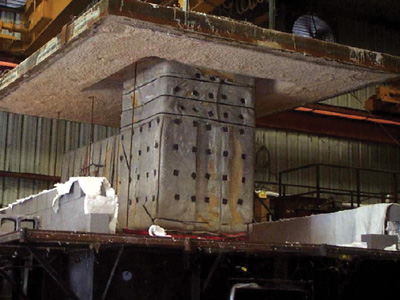 Figure 7
Grease Duct Enfulgment
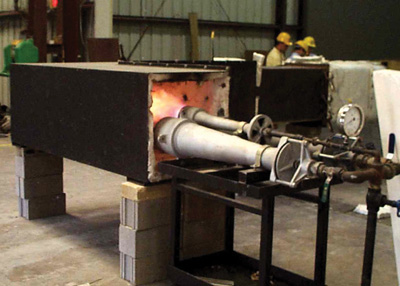 Figure 8
AC101 500°F flame
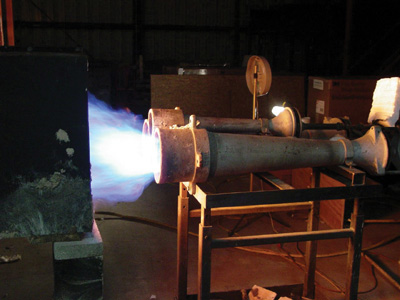 Figure 9
AC101 2000°F flame