In Search of Temperature
Opportunities to use handheld, noncontact, infrared (IR) thermometry in the installation and maintenance of a thermal insulation system are everywhere, and industrial plant and energy management professionals are picking up on it.
Driving recognition of the value of this technology in a wide range of industrial settings is a growing awareness that temperature measurement can be a critical indicator of existing or impending problems with plant equipment and processes. It’s also a method of visually demonstrating energy savings and losses in large and small facilities. These are facts that have been well known in automotive circles for years, and a boon to equipment maintenance and heating and air-conditioning technicians as well. Accurately, instantly and safely measuring temperatures in hard-to-reach, too-hot-to-touch, or dangerous locations is what portable infrared thermometry does best.
Affordability, Ease of Use Help Drive Demand
Ease of use, flexibility, accuracy and safety has inspired many to use infrared technology as a diagnostic, maintenance, equipment failure and downtime prevention tool. But that acceptance is a fairly recent shift, primarily because the cost of what was an expensive option has dropped dramatically, with models in all budget categories and for nearly every use now available.
Prices typically range from as low as $99 for basic models with few options, to as high as approximately $2,500 for specialty-built, high performance models that can measure temperatures as low as minus 20 degrees fahrenheit and as high as 5400 degrees fahrenheit. Middle range IR thermometers with options such as data logging and circular laser sighting systems cost between $250 and $450, while those with superior optics and graphing software are approximately $1,000.
How Infrared Thermometers Work
Even though infrared thermometry technology is sophisticated, it’s simple to use. Handheld units are typically gun-shaped, and the user simply points the thermometer at the object to be measured, pulls the trigger and read the temperature in the liquid crystal display (LCD) window.
As easy as it is to use, it’s still important to understand how IR technology works and what it can and can’t do. IR thermometers capture the invisible infrared energy that’s naturally emitted from the surface of all objects. As a result, IR thermometers measure surface temperatures only. When IR thermometers measure surface temperatures, they sense reflected, transmitted, and emitted energy. Therefore, all thermometers have to be adjusted so they will read emitted energy only. Some IR thermometers allow users to adjust the emissivity in the unit for more accurate readings on all material types. Others have a fixed, pre-set emissivity of 0.95, which is the emissivity value for most organic materials and painted or oxidized surfaces.
In addition, IR thermometers can’t measure accurately through glass, as it has very distinctive reflection and transmission properties. Moreover, they aren’t usually recommended for measuring shiny or polished metal surfaces such as stainless steel or aluminum. However, covering the surface to be measured with masking tape or flat black paint can produce accurate measurements, as long as the tape or paint is allowed to reach the same temperature as the material underneath.
IR radiation is part of the electromagnetic spectrum, which includes radio waves, microwaves, visible light, ultraviolet, gamma and X-rays. It falls between the visible light of the spectrum and radio waves, and is usually expressed in microns with the infrared spectrum extending from 0.7 to 1000 microns. In practice, the 0.7 to 14 micron band is generally used for IR temperature measurement.
Choosing the Right Unit
A wide range of models give users many choices. Units with few options to high performance products that can download logged data for use in computer programs, such as 3E Plus®, a free software program from the U.S. Department of Energy’s Office of Information Technology, are available. The 3E Plus software provides quick, painless energy and dollar savings calculations. In choosing the appropriate model, the user should select a thermometer based on the answers to three key questions:
- What temperature range will I need to measure?
- How far away from my target do I want to be when I take my measurements?
- How precise must the temperature measurement be?
Identifying the temperature range needed on an IR thermometer is straightforward, as each model is designed for a specific temperature range, including subzero models, some of which can measure temperatures as low as minus 50 degrees fahrenheit.
But relating the distance to the target to be measured to a particular thermometer model is a more complex situation, and relies on the instrument’s optical ability. When temperature is measured by a non-contact device, the IR energy emitted from the object passes through the optical system and is converted to an electrical signal at the detector, and is then displayed as a temperature reading.
Most manufacturers calculate the optical resolution as a ratio of the target diameter ("spot") containing 90 percent of target energy to the distance. The user’s manual provided with each unit shows the distance to spot (D:S) ratio at a range of distances. Using this information, the user can choose an IR thermometer that has a D:S ratio that meets the distance and target size requirements for the project. The higher the D:S ratio is, the more expensive the model is likely to be.
When precise temperature measurement is required, the user must consider what information is needed. If tracking temperature trends over time is desired, a professional model thermometer with greater than 1 percent accuracy is recommended. However, if only large temperature differentials are needed, an entry-level unit with a 2 percent to 3 percent level of accuracy may suffice.
Infrared Sighting Systems
IR thermometers designed for industrial use can have single point or circular laser sighting systems that provide various aiming advantages. Laser sighting doesn’t measure temperature, it merely helps to effectively aim the thermometer. It’s the IR detector inside the thermometer that senses the IR energy being emitted from the target being measured.
A single point sighting system aims the thermometer at the center of the target for accurate aim, but it doesn’t show the boundaries of the measured area, or the size of the target. The user must calculate or look up the target size in the user’s manual.
Offset sighting finds the energy spot’s center from a slight angle because the laser is actually mounted above the IR detector. This "parallax" effect can cause a mismatch between the IR circle’s center and the laser sighting’s center, and is more pronounced in the near field. As a result, some IR thermometers may miss large parts of the target energy.
Similarly, circular sighting systems with offset mounting contain a large portion of the target energy within the circle while helping aim the unit using the center dot. Like the single point with offset sighting, a parallax occurs, especially in the near field, which doesn’t track with the IR beam. Accuracy can be affected because the relationship of the IR beam to the sighting isn’t constant at all distances.
The most precisely sighted portable IR thermometers (and as a result, the most costly), are those that feature circular laser sighting systems with coaxial mounting, which places the laser and IR beams on nearly the same pathway. These models highlight approximately 90 percent of the measured target at all distances, and are especially useful in the near field and for close-focus. Because of their optical precision, these high performance models allow the user to pick the temperature through a maze of hot, dangerous pipes without having to move a ladder.
It also helps to understand that laser and IR beams travel in different ways. Laser beams travel in a straight line from their source with the pattern spreading in a cone shape from the thermometer. By comparison, IR beams take a "bowtie" route of travel that narrows until the focal point and then expands.
Once an IR thermometer has been purchased, most models can be put to effective use within 10 minutes, including reading the owner’s manual. Higher performance models with data logging and graphing and trending software have a somewhat longer learning curve, but can be quickly mastered with the help of tutorials.
There are three basic techniques that can be used to take IR readings.
- Spot measuring: determines the absolute surface temperature of an object
- Temperature differentials: compares two separate spot measurements, either in different locations or at the same location over time
- Scanning: identifies hot or cold spots when you hold the trigger while moving the thermometer along the target
Since temperature is a key indicator in thermal insulation systems, all three of these techniques can be used for a variety of installation or troubleshooting activities. For instance, by scanning along the insulated piping, the user can instantly, safely and accurately detect costly problems such as hairline cracks in an insulation system. Evaluations to determine where energy is being lost in certain locations can be documented by spot measuring. Temperature differentials are a "natural" means of determining the before and after affects of added insulation.
Saving Time and Money
The greatest value of using IR technology in the insulation installation industry may lie in its ability to visually document heating and cooling losses to potential customers, by spot measuring and recording and tracking temperature differentials. In addition, infrared technology is a time saver. When used with software programs such as 3E Plus, it can precisely evaluate thermal insulation options.
As an example, an energy management engineer at Goodyear Tire in Akron, Ohio, used an IR thermometer on a project to evaluate the need for insulation on a bare steam condensate return line. Measuring the temperature of the pipe at various spots gave him a "real world" way to check "book" heat loss calculations.
"It turned out in this case that the insulation project did not meet our funding criteria, but at least the thermometer helped us make an informed decision," he said.
He found that it also gave him a very quick way to tell which hot lines were in actual use. On steam systems, for example, he used his IR thermometer to roughly categorize steam traps by temperature so he could tell where he should concentrate his insulation efforts.
But his biggest pay-off using his IR thermometer came after he used it to figure out the route of water flowing through a maze of pipes in a seven-story, 500,000 square foot building.
He approached the job in winter when the pipes would be significantly colder than the ambient temperature. Pipes with actively flowing water measured 40 degrees fahrenheit. With that information as his guide, he followed pipes that lead in all directions and sometimes to dead ends.
"I found some places where water was flowing in large quantities down the sewer because a hose had been connected where it shouldn’t have been," he said.
In another instance, he found a water-cooled heat exchanger that hadn’t been used in years but still had water flowing through it. In less than a week of part time work, he had traced the pipes and drawn a map of the entire water system, and saved $100,000 in the process.
Similarly, a chief engineer at a 33-story co-op complex in New York, connected to three additional buildings that include a movie theatre, restaurant, bank, drug store, beauty parlor and country club with two pools, exercise rooms and an 18-hole golf course, found IR thermometry a very useful and time saving tool.
"Working around a power plant you sometimes cannot get close enough to your target for other instruments to zero in on a reading (3 feet to 6 feet)," he said. "I can be within 20 to 30 feet and use the target dots (circular laser) to tell where I am reading"
Benefits for Insulation Professionals
Clearly, for thermal insulation professionals, IR thermometers can be just as powerful in documenting heat or cooling losses before, and energy savings after installation of thermal systems, adding credibility to a contractor’s recommendation. Moreover, it can be done very quickly and safely without having to climb on ladders. Scanning already installed systems, even in very large facilities with hard to reach pipes to find cracks and breaks, or locations that are under insulated that may be responsible for energy losses, can be accomplished in a relatively short time with the appropriate IR thermometer.
Likewise, using a portable IR thermometer to measure the surface temperatures of pipes and then feeding that information into a program like 3E Plus can help make appropriate, high return on investment choices about the type of insulation and thickness needed for each job, and confirm a temperature baseline.
Temperature is the tie that binds thermal insulation systems and IR thermometry together. Where there are temperature issues, it’s important to have safe, accurate and easy ways to evaluate those challenges. Once those issues are identified and documented, thermal insulation systems can be specified and installed. After those systems are installed, IR thermometry can help keep them properly monitored and maintained.
As in the case of the Goodyear Tire engineer, the return on the investment in an IR thermometer can be as short as a week or a day. In a temperature driven environment such as thermal insulation specification installation, the opportunities for its use are limited only by the user’s imagination.
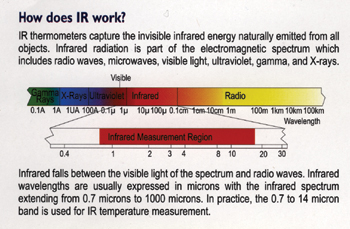 Figure 1
 Figure 2