Making Mold a Problem of the Past
Molds can be found almost anywhere; they can grow on virtually any organic substance, as long as moisture and oxygen are present. There are molds that can grow on wood, paper, carpet, foods, and insulation. When excessive moisture accumulates in buildings or on building materials, mold growth will often occur, particularly if the moisture problem remains undiscovered or unaddressed. It is impossible to eliminate all mold and mold spores in the indoor environment. However, mold growth can be controlled indoors by controlling moisture indoors.
Concern about indoor exposure to mold has been increasing as the public becomes aware that exposure to mold can cause a variety of health effects and symptoms, including allergic reactions. This article presents guidelines for the remediation and cleanup of mold and moisture problems in schools and commercial buildings.
Key Steps for Mold Remediation
- Consult a health professional as appropriate throughout the process.
- Select a remediation manager.
- Select a team of remediation personnel.
- Choose between outside or in-house expertise.
- Assess the size of the mold problem and note the type of mold-damaged materials.
- Communicate with building occupants throughout the process, as appropriate to the situation.
- Identify the source or cause of the water or moisture problem.
- Plan remediation and adapt available guidelines to fit the situation (see Figures 1 and 2).
- Select personal protective equipment (PPE).
- Select containment equipment.
- Remediate.
- Fix the water or moisture problem.
- Clean and dry moldy materials (see Figure 2).
- Discard moldy items that can’t be cleaned.
- Dry non-moldy items within 48 hours (see Figure 1).
- Check for the return of moisture and/or the mold problem.
- If hidden mold is discovered, reevaluate the plan.
Laying the Groundwork
It is important to start by developing a remediation plan. Assess the size of the mold and/or moisture problem and the type of damaged materials before planning the remediation work. Select a remediation manager for medium or large jobs (or small jobs requiring more than one person). The remediation plan should include steps to fix the water or moisture problem, or the problem may reoccur. The plan should cover the use of appropriate personal protective equipment (PPE), and should include steps to carefully contain and remove moldy building materials to avoid spreading the mold. A remediation plan may vary greatly depending on the size and complexity of the job, and it may require revision if circumstances change or new facts are discovered.
The remediation manager’s highest priority must be to protect the health and safety of the building occupants and remediators. It is also important to communicate with building occupants when mold problems are identified. In some cases, especially those involving large areas of contamination, the remediation plan may include temporary relocation of some or all of the building occupants.
When making the decision to relocate occupants, one should consider the size and type of the area affected by mold growth, the type and extent of health effects reported by the occupants, the potential health risks that could be associated with debris, and the amount of disruption likely to be caused by remediation activities. If possible, remediation activities should be scheduled during off-hours when building occupants are less likely to be affected.
Remediators, particularly those with health-related concerns, may wish to check with their doctors or health-care professionals before working on mold remediation or investigating potentially moldy areas.
HVAC Systems and Mold
Do not run the heating, ventilation, and air-conditioning (HVAC) system if you know or suspect that it is contaminated with mold. If you suspect that it may be contaminated (for example, if it is part of an identified moisture problem or there is mold growth near the intake to the system), consult the EPA’s guide at www.epa.gov/iaq/pubs/airduct.html before taking further action.
Hidden Mold
In some cases, indoor mold growth may not be obvious. It is possible that mold may be growing on hidden surfaces, such as the back side of dry wall, wallpaper, or paneling; the top of ceiling tiles; or the underside of carpets and pads. Possible locations of hidden mold can include pipe chases and utility tunnels (with leaking or condensing pipes), walls behind furniture (where condensation forms), condensate drain pans inside air-handling units, porous thermal or acoustic liners inside ductwork, or roof materials above ceiling tiles (due to roof leaks or insufficient insulation).
Some building materials—such as dry wall with vinyl wallpaper over it or wood paneling—may act as vapor barriers, trapping moisture underneath their surfaces and thereby providing a moist environment where mold can grow. You may suspect hidden mold if a building smells moldy but you cannot see the source, or if you know there has been water damage and building occupants are reporting health problems. Investigating hidden mold problems may be difficult and will require caution when the investigation involves disturbing potential sites of mold growth; make sure to use PPE. For example, removal of wallpaper can lead to a massive release of spores from mold growing on the underside of the paper. If you believe that you may have a hidden mold problem, you may want to consider hiring an experienced professional. If you discover hidden mold, you should revise your remediation plan to account for the total area affected by mold growth.
Reaching Remediation
The following are the most critical steps to mold remediation:
- Fix the water or humidity problem. Complete and carry out a plan for repairs if it is appropriate. Revise and/or carry out a maintenance plan if necessary. Revise the remediation plan as necessary, if more damage is discovered during remediation.
- Communicate. Continue to discuss progress with building occupants, as appropriate to the situation. Be sure to address all concerns.
- Clean up mold and dry water-damaged areas completely. Select appropriate cleaning and drying methods for damaged and contaminated materials. Carefully contain and remove moldy building materials. Use appropriate PPE, and arrange for outside professional support if necessary.
Figure 1 offers strategies for responding to water damage within 24 to 48 hours. These guidelines are designed to help avoid the need for remediation of mold growth by taking quick action before growth starts. Depending on the size of the area involved and resources available, professional assistance may be needed to dry an area quickly and thoroughly.
Figure 2 presents remediation guidelines for building materials that have or are likely to have mold growth. The guidelines in Figure 2 are designed to protect the health of the building’s occupants and cleanup personnel during remediation. These guidelines are based on the area and type of material affected by water damage and/or mold growth. Please note that these are guidelines; some professionals may prefer other cleaning methods.
Although the level of personal protection suggested in these guidelines is based on the total surface area contaminated and the potential for remediator and/or occupant exposure, professional judgment should always play a part in remediation decisions. When in doubt, caution is always advised. Consult an experienced mold remediator for more information. In cases in which a particularly toxic mold species has been identified or is suspected, when extensive hidden mold is expected (such as behind vinyl wallpaper or in the HVAC system), when the chances of the mold becoming airborne are estimated to be high, or when sensitive individuals (such as those with severe allergies or asthma) are present, a more cautious or conservative approach to remediation is indicated. Always make sure to protect remediators and building occupants from exposure to mold.
Cleanup Methods
The following mold cleanup methods are available for remediating damage to building materials and furnishings caused by moisture-control problems and mold growth:
- Use a wet vacuum. Wet vacuums are vacuum cleaners designed to collect water. They can be used to remove water from floors, carpets, and hard surfaces where water has accumulated. They should not be used to vacuum porous materials, such as gypsum board. They should be used only when materials are still wet; wet vacuums may spread spores if sufficient liquid is not present. The tanks, hoses, and attachments of these vacuums should be thoroughly cleaned and dried after use, because mold and mold spores may stick to the surfaces.
- Remove mold with a damp wipe. Mold can generally be removed from nonporous (hard) surfaces by wiping or scrubbing with water, or with water and detergent. It is important to dry these surfaces quickly and thoroughly to discourage any further mold growth. Instructions for cleaning surfaces, as listed on product labels, should always be read and followed. Any porous materials that are wet and have mold already growing on them may have to be discarded.
- Vacuum with a HEPA vacuum. High-Efficiency Particulate Air (HEPA) vacuums are recommended for final cleanup of remediation areas, after materials have been thoroughly dried and contaminated materials removed. HEPA vacuums are also recommended for cleanup of dust that may have settled on surfaces outside the remediation area. Care must be taken to assure that the filter is properly seated in the vacuum so that all the air must pass through the filter. When changing the vacuum filter, remediators should wear PPE to prevent exposure to the mold that has been captured. The filter and contents of the HEPA vacuum must be disposed of in well-sealed plastic bags.
- Remove damaged materials and seal in plastic bags. Any building materials and furnishings that are contaminated with mold growth and are not salvageable should be double-bagged using 6-mil polyethylene sheeting. These materials can usually be discarded as ordinary construction waste. It is important to package mold-contaminated materials in sealed bags before removing them from the containment area to minimize the dispersion of mold spores throughout the building. Large items that have heavy mold growth on them should be covered with polyethylene sheeting and then sealed with duct tape before they are completely removed from the containment area.
Containment Tips
The purpose of containment during mold remediation activities is to limit the release of mold and other toxins into the air and surroundings, minimizing the exposure of remediators and occupants to mold. The following tips will help keep mold and moldy debris from spreading to areas beyond the contaminated site:
- Maintain the containment area under negative pressure.
- Use exhaust fans to the outdoors and ensure that adequate makeup air is provided.
- Make sure the polyethylene sheeting billows inward on all surfaces when containment is working. If it flutters or billows outward, containment has been lost, and you should find and correct the problem before continuing.
How To Know Remediation and Cleanup Are Finished
Make sure each item on the following checklist is complete to ensure that the remediation process is finished:
- The water or moisture problem has been completely fixed.
- Mold removal is complete. (Use professional judgment to determine if the cleanup is sufficient. Visible mold, mold damaged materials, and moldy odors should not be present.)
- If sampling was used, the kinds and concentrations of mold and mold spores in the building should be similar to those found outside once cleanup activities have been done.
- Shortly after remediation, a visit to the site(s) should reveal no signs of water damage or mold growth.
- People should be able to occupy or re-occupy the building space without health complaints or physical symptoms.
This article has been reprinted with permission from the U.S. Environmental Protection Agency (EPA). For expanded information, please visit www.epa.gov/mold/mold_remediation.html.
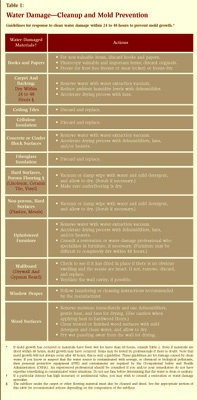 Figure 1
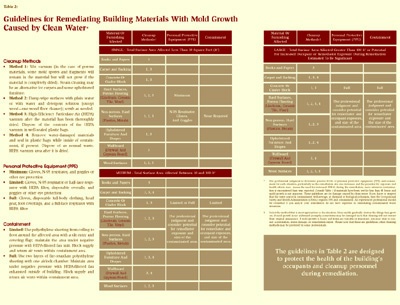 Figure 2