seeing the light
Thermal imaging, thermography, infrared scanning; these all mean pretty much the same thing-taking a picture of heat. The technology is used in several industries, including medical, automotive, and manufacturing, but the fit for our industry is nearly a perfect one. The invisible substance that we spend our workdays trying to control and contain is heat. What could be better than a tool that lets us see that heat and even lets us see how it moves in real time?
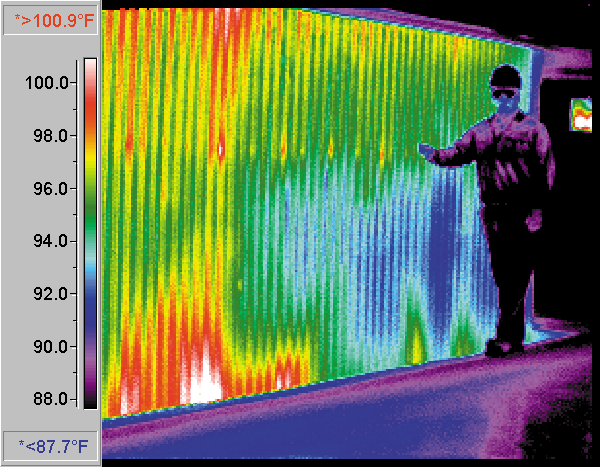
You might think that it’s like having x-ray vision-seeing inside a wall to find out where and how the heat is escaping-and it is almost that good. But because thermal imaging systems pick up the temperature of the first solid surface they see (such as the finished surface of the wall), any information about what’s happening inside the wall is only deduced by analyzing the image of the surface temperature in great detail.
Sometimes the analysis is easy, such as when the studs in a wall telegraph through the surface like cold prison bars, or when an invisible tear in the insulation near the ceiling shows up as a bloom of color on the infrared scan. More often, the image is complex and requires a trained thermographer to interpret it properly. But don’t worry-if you commit to using thermal imaging technology in your business, you or a member of your crew can get the training and certification you need fairly quickly.
Sensing Infrared Light
When you look at an object and notice its color, your eyes are interpreting the wavelength of the visible light reflected from the surface of the object. But the visible light that our eyes respond to represents just a tiny segment of the spectrum of electromagnetic waves bouncing around us all the time. Beyond the blue end of our visible scale lies ultraviolet light and x-rays. Off the red end are radio waves, microwaves, and the most important for our purposes, infrared light.
Translating those invisible wavelengths into something we can see is what the science of thermography is all about.
The first infrared images were seen in the late 1800’s, when photographers experimented with different chemicals on film plates and found one that produced photos showing hot objects as white and cooler objects as grey or black. A burgeoning electronics industry in the 1940’s provided World War II sharpshooters with infrared scopes for their rifles that could detect and highlight a target even on a pitch-black night.
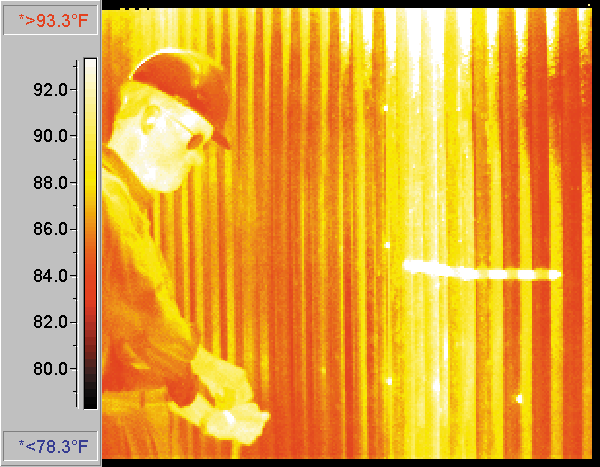
With the more recent computer revolution, inventors made electronic sensors tuned to pick up only the infrared spectrum of light. The individual sensors are tiny: as many as 60,000 sensors fit on a computer chip measuring ½-inch along each edge. Each sensor reports the wavelength of the light it receives, but that data doesn’t translate into anything our eyes can see, so researchers developed a software filter to produce color images with visible light wavelengths. The software divides the infrared spectrum into hundreds of sections based on the wavelength of the light, assigns each division a corresponding value in the visible spectrum, and sends that value to the screen, eyepiece, or videotape. These divisions and assignments are fairly arbitrary, but with a color-coded key for reference, you can get a very detailed picture of how heat flows through any area photographed.
The Cameras
Portable thermal imaging cameras look a lot like the early VHS camcorders. While styles vary, the most common type uses an internal battery pack, sits on the operator’s shoulder when in use, and records images on a PCMCIA (Personal Computer Memory Card International Association) card, Flashcard, or videotape.
According to John Snell, owner of Snell Infrared, a company that trains and certifies thermographers in Montpelier, Vermont, the cameras are fairly simple to use. “We can train anyone to get a good image in about an hour,” says Snell. “Learning to interpret a complex image accurately takes about a week’s worth of training.”
Technology like this isn’t cheap, of course-thermal imaging systems for evaluating insulation coverage in a building cost between about $15,000 and $60,000. This price usually includes the camera, cables, and output devices needed to create and view thermal images. Most companies also offer on-site training and technical support to help you use the equipment to the fullest.
The Apparent Advantages
The advantages of an infrared temperature-sensing system are pretty clear. First, it’s non-contact-you don’t need to get yourself and a temperature probe up to that steam pipe 40 feet above the factory floor-you can work standing safely on the ground.
Second, it’s very accurate-systems available today offer accuracy to .01 degrees Fahrenheit. High-price systems offer even greater accuracy, but consider this issue carefully when you’re shopping for a system. You may not need such detailed accuracy for your application. Buying only as much tool as you need can save you lots of money and shorten the payback period considerably.
And third, a thermal image gives you a digital snapshot-a detailed report of how heat is moving through a large complex space-for an instant in time. A careful evaluation of the image helps you pinpoint problem areas and recommend specific remedies. This targeted approach to solving insulation problems in a building’s envelope saves time and money.
Several of the companies listed in the Sources of Supply section in cluded in this article also offer hand-held devices that go by names like spot radiometers, infrared thermometers, or pyrometers. These sell for anywhere from $99 to $3,000, but are generally not much use for evaluating insulation. The reason is that they’re limited function, single-point tools which measure temperature in only one small spot at a time. The display shows a cross-hair sight and reads the temperature from the center of the cross hairs only-often an area as small as a 1-inch diameter circle at a distance of 15 feet. The temperature is reported digitally on a small readout screen, so there’s no actual image created.
This tool works quite well for certain applications, such as spotting an overheated breaker in a sub-panel, or spot-checking products leaving a production line, but trying to evaluate the insulation in a building’s walls or a large piping system with a tool like this would be very tedious.
Working with Thermal Imaging Cameras
To get some hands-on advice about using thermography in industrial settings, we interviewed Lois Broeker, the chair of the Thermolead Steering Committee on the Corporate Leadership Team at DuPont Lycra®/Terathane® in Niagara Falls, NY. Certified in the use of thermal cameras, Ms. Broeker is the first female thermographer in the DuPont corporation.
Insulation Outlook: Please tell us about your experience evaluating insulation coverage in DuPont’s buildings and piping systems.
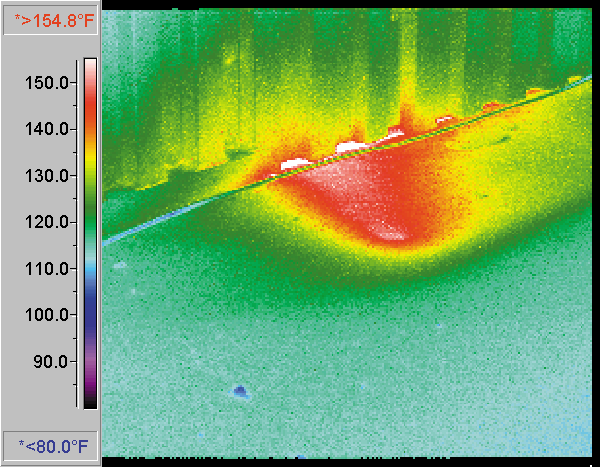
Lois Broeker: I am lucky in Niagara Falls, since the winters are very cold, and heat loss under insulation is fairly easy to detect. The heat trace on the piping is also very obvious. On my images, I am able to see most all gaps, holes, or loose areas on and around piping systems and valves. This helps us to detect areas of potential freeze ups quickly and efficiently.
IO: What’s the primary application for which you use thermal cameras?
LB: There are several applications at the Niagara site, the top three being inspecting electrical panels, checking MCC’s (Motor Control Center), and the detection of plugs in pipelines. I also check for proper levels or any other problems in vessels and tanks. I am able to detect solids and liquid levels in them in a few seconds.
IO: What are the biggest obstacles to getting clean thermal images that are easy to read?
LB: There are many things that can hinder getting a good thermal image. The emissivity of an object is critical. Emissivity is the ratio of the rate of radiant energy emitted from an object (based on temperature alone), to the corresponding rate of emission from a black body at the same temperature. This basically means that a shiny object can give you a flawed reading. When working indoors, I have been known to cover up lights, and spray reflective surfaces with flat black paint. Some qualities of a good photo are focus, composition, range or aperture, level and span, and palette. I love to do outside work very early in the morning before the sun rises. That way, the sun hasn’t warmed the surface of the piece of equipment yet, which may lead to a false reading.
IO: What sort of camera do you use?
LB: I use the Flir Thermacam 280. It is an excellent all around camera. Very light, easy to use, and it takes beautiful thermal images. The corresponding software, Thermacam Reporter 99, is user-friendly, and produces great reports quickly.
IO: Do you output your images to disk, videotape, or PCMCIA card?
LB: I save images to a PCMCIA card, but I have the ability to make videos as well. I mostly use still photographs in my work, since that fits my specific needs the best. Typically, with the aggressive process we have, I just print out a still image. If there is a problem, we must act on it right away.
IO: How difficult is it to interpret an image accurately?
LB: The first couple of months you begin to take images, you are usually humbled at least a few times. It is EXTREMELY easy to make a bad call on an image, since there are so many variables that can affect them. As with many crafts, experience and practice are the best teachers. If you are trying to tell someone an exact temperature of a chrome or stainless pipe or copper bus bar, you’re going to expose your limitations very quickly.
IO: How did you learn to make and read thermal images?
LB: I took my Level I and Level II certification courses at the Snell Infrared School in Montpelier, Vermont, founded by John Snell. They give courses and seminars all over the country as well as overseas. They will also come to your site, if you get a group together. They are the only certifier that DuPont recognizes. This is due to the high quality and consistency of the training they offer. All the teachers and staff are excellent. They have seminars and refreshers throughout the year. My Thermolead Steering Committee meets once a year, and we set guidelines and expectations for all the corporate thermographers. We also write corporate standards for thermography and electrical safety.
IO: What’s the coolest application of this equipment you know of?
LB: There are so many cool applications for thermography! I love the industrial applications, many of which we’ve talked about, but I also enjoy taking the camera to the zoo, and discovering where each animal is emitting body heat. They use infrared cameras at horse races to detect early signs of tendonitis in the horses, so I rush to any friend who has a sore knee or a stiff elbow and try to detect the inflammation. I take the camera out in the woods after dark and a whole new world opens up before me in the viewfinder. I check the homes of family and friends for heat loss at the beginning of winter, pointing out leaky windows! The list goes on and on.
IO: Tell us about dramatic results, either from a misreading or something you couldn’t have seen without infrared.
LB: I have a great success story. I got a call that one of our tank samples showed a problem with the mix we needed. I shot an image of the side of the tank, and discovered a teardrop shaped “hot spot.” I didn’t have a “baseline” image of this particular tank, which would have shown me a normal operating view, so I backed it up with ultrasonic thickness checks, and found out that the tank wall in that area was less than half the original thickness. I asked for a shutdown, and when they opened the tank up, we found that the internal dip tube was broken, and acid was spraying directly onto the side of the tank, eating it away. The implications to safety, and the environmental impact were extremely high, and an unexpected shut down costs about a million dollars a day. We were able to plan a shutdown and avoid a serious incident. The camera paid for itself that day!


